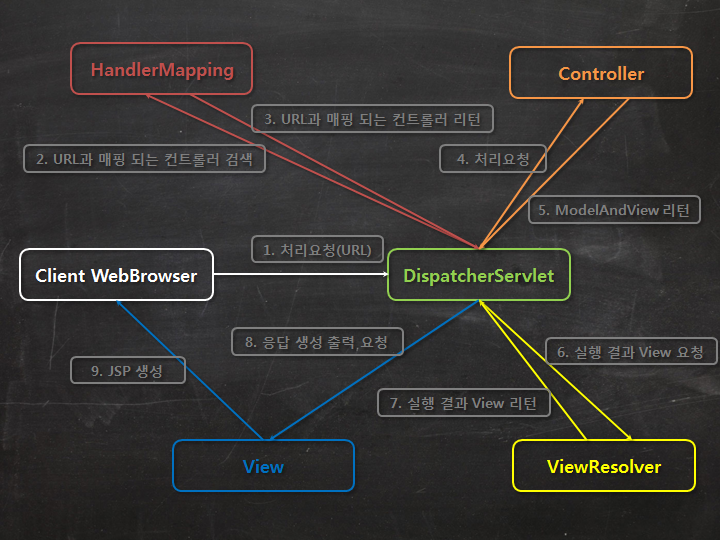
Chapter6. 웹 뷰 렌더링
6.1 뷰 리졸루션 이해하기
뷰 리졸버의 역할
모델을 실제로 렌더링하기 위해 구현되어있는 뷰를 결정하는 역할.
스프링MVC는 아래와 같은 내용의 ViewRewolver 인터페이스를 정의한다.
public interface ViewResolver {
  View resolveViewName(String viewName, Locale locale) throws Exception;
}
resolveVeiwName() 메소드는 view이름, locale을 넘겨받고 view인스턴스를 return한다.
view의 다른 인터페이스는 다음과 같다.
public interface View {
  String getContentType();
  void render(Map<String,?> model, HttpServletRequest request, HttpServletResponse response) throws Exception;
}
view 인터페이스는 모델, 서블릿 요청, 응답객체를 전달받아 결과를 응답 내의 결과에 렌더링한다.
스프링은 상황에 맞게 바로 사용할 수 있는 13가지 ViewResolver를 제공한다. (p.201)
- InternalResourceResolver는 일반적으로 JSP에 사용되고,
- TilesViewResolver는 아파치 타일즈 뷰에 사용되고,
- FreeMarkerViewResolver는 FreeMarker 템플릿 뷰,
- VelocityViewResolver는 Velocity템플릿 뷰에 대응한다.
6.2 JSP 뷰 만들기
스프링은 두가지 방식으로 JSP를 지원한다
- InternalResourceViewResolver는 JSP파일에 뷰 이름을 결정하기 위해서 사용한다. JSP페이지의 JSTL을 사용하는 경우 InternalResourceViewResolver는 JstlView에 의한 JSP파일로 뷰 이름을 결정하고, JSTL포맷과 메시지 태그에 JSTL locale, resource bundle변수를 대입한다.
- 스프링은 form-to-model 바인딩을 위한 것과 일반적인 유틸리티 기능을 제공하는 두 개의 JSP 태그 라이브러리를 제공한다.
6.2.1 JSP-ready 뷰 리졸버 설정하기
1) 기본적인 InternalResourceViewResolver
InternalResourceViewResolver는 웹 애플리케이션 뷰 리소스의 물리적 path를 결정하기 위해 prefix, suffix를 뷰 이름에 붙이는 규칙을 따른다.
일반적으로 JSP파일들은 직접적인 접근을 막기 위해 웹애플리케이션의 WEB-INF폴어데 넣어둔다.
메소드에서 설정
@Bean
public ViewResolver viewResolver() {
  InternalResourceViewResolver resolver = new InternalResourceViewResolver();
  resolver.setPrefix("/WEB-INF/views/");
  resolver.setSuffix(".jsp");
  return resolver;
}
XML에서 설정
<bean class="org.springframework.web.servlet.view.InternalResourceViewResolver">
  <property name="prefix" value="/WEB-INF/views/" />
  <property name="suffix" value=".jsp" />
</bean>
2) JSTL 뷰 결정하기
여기까지는 기본적인 InternalResourceViewResolver를 설정했다. 여기서 추가적으로 JSTL을 사용하려면 다음과 같이 추가하면 된다.
JSTL : 메소드에서 설정
@Bean
public ViewResolver viewResolver() {
  InternalResourceViewResolver resolver = new InternalResourceViewResolver();
  resolver.setPrefix("/WEB-INF/views/");
  resolver.setSuffix(".jsp");
  resolver.setViewClass(org.springframework.web.servlet.view.JstlView.class);
  return resolver;
}
JSTL : XML에서 설정
<bean class="org.springframework.web.servlet.view.InternalResourceViewResolver">
  <property name="prefix" value="/WEB-INF/views/" />
  <property name="suffix" value=".jsp" />
  <property name="viewClass" value="org.springframework.web.servlet.view.JstlView"/>
</bean>
6.2.2 스프링 JSP라이브러리 사용하기
1) 폼에 모델 바인딩하기
스프링의 폼 바인딩 JSP태그 라이브러리에는 14개의 태그가 있다. 이들 대부분은 HTML폼 태그를 랜더링한다. 이 태그들이 HTML태그들과 다른점은 모델의 객체로 바인딩된다는 점과 모델 객체의 프로버티로부터 값이 입력되는 것이 가능하다는 점이다.
폼바인딩 태그를 사용하기 위해서는 JSP페이지 안에 아래의 내용을 선언한다.
<%@ taglib uri="http://www.springframework.org/tags/form" prefix="sf"%>
이 책에서는 간결하고 입력하기 쉬운 이유로 prefix를 Spring Forms의 축약 sf로 가정한다. 폼 바인딩 태그 라이브러리가 선언되면 (p.206) 표에 나와있는 14개의 태그를 사용한다.
Example
<sf:checkbox>, <sf:input>, <sf:label>,...
Example
<sf:form method="POST" commandName="user">
  Fist Name : <sf:input path="firstName"/>
  Last Name : <sf:input path="lastName"/>
</sf:form>
2) 오류 표시하기
3) 스프링의 일반 태그 라이브러리
4) 다국어 메시지 표시하기
5) URL만들기
6) 콘텐트 이스케이핑
6.3 아파치 타일즈 뷰로 레이아웃 정의하기
아파치 타일즈는 레이아웃 엔진중 하나. 레이아웃 엔진은 말그대로 레이아웃 잡는 것을 도와 준다.
예를 들어 구현해야 할 페이지가 많을 때 공통적으로 사용하는 header 영역, footer 영역을 어떻게 관리 할 것인가? JSP 코드에서 매번 include 해 준다? 번거롭다. 레이아웃 엔진으로 미리 잡아 주면 main 영역 코드만 짜면 된다.
Apache Tiles 기본 사용법
설정 (ex. tiles.xml)
<?xml version="1.0" encoding="ISO-8859-1" ?>
<!DOCTYPE tiles-definitions PUBLIC
       "-//Apache Software Foundation//DTD Tiles Configuration 3.0//EN"
       "http://tiles.apache.org/dtds/tiles-config_3_0.dtd">
<tiles-definitions>

  <definition name="base" template="/WEB-INF/layout/page.jsp"> // 기본 타일 정의
    <put-attribute name="header" value="/WEB-INF/layout/header.jsp" />
    <put-attribute name="footer" value="/WEB-INF/layout/footer.jsp" />
  </definition>

  <definition name="home" extends="base"> // 기본 타일 확장
    <put-attribute name="body" value="/WEB-INF/views/home.jsp" />
  </definition>

</tiles-definitions>
base 레이아웃으로 page.jsp 를 사용 했다. home 은 base 를 상속 받아 body 에 home.jsp 를 넣는다.
레이아웃 파일. page.jsp
<%@ taglib uri="http://www.springframework.org/tags" prefix="s" %>
<%@ taglib uri="http://tiles.apache.org/tags-tiles" prefix="t" %>
<%@ page session="false" %>
<!DOCTYPE html>
<html>
  <head>
    <title>June Kim's World!</title>
...
  <body>
    <t:insertAttribute name="header" />

    <div class="container">
    <t:insertAttribute name="body" />
    </div><!-- /.container -->

    <t:insertAttribute name="footer" />
  </body>
</html>
spring 에서 사용 하려면
일단 디펜던시 추가 해 주자. 기존 JSP 설정에 tiles-jsp:3.0.4 를 추가 하면 된다.
compile('org.apache.tomcat.embed:tomcat-embed-jasper')
compile('org.apache.tiles:tiles-jsp:3.0.4')
compile('javax.servlet:jstl')
Config 에 다음의 내용을 추가 한다. WebConfig.java
    @Bean
    public TilesConfigurer tilesConfigurer() {
        final TilesConfigurer configurer = new TilesConfigurer(); // 타일 정의
        configurer.setDefinitions(new String[] { "WEB-INF/layout/tiles.xml" }); // 설정 파일 위치
        configurer.setCheckRefresh(true); // 리프레시를 가능하게 설정
        return configurer;
    }

    @Bean
    public TilesViewResolver tilesViewResolver() {
        final TilesViewResolver resolver = new TilesViewResolver();
        resolver.setViewClass(TilesView.class);
        return resolver;
    }
자세한 설정은 http://docs.spring.io/spring/docs/4.2.6.RELEASE/spring-framework-reference/html/view.html#view-tiles-integrate 를 참고 한다.
레이아웃 템플릿 엔진. Tiles, Sitemesh
대표적으로 Tiles, Sitemesh
 https://www.google.com/trends/explore#q=apache%20tiles%2C%20sitemesh
2011 KSUG 글 https://groups.google.com/forum/#!topic/ksug/fuLQvWC_ikw
박** 전 tiles 1 < sitemesh < tiles 2 순입니다. 사실 둘 다 마음에 안 듭니다.
참고자료
- 타일즈(Tiles) 프레임워크 2015.07.28 http://expitly.tistory.com/13
- Tiles 는 Composite View 패턴
- Sitemesh 는 Decorator 패턴
Tiles VS SiteMesh 2014.01.21 http://sojw.tistory.com/1169742017
Tiles VS SiteMesh 2009.05.01 http://whiteship.tistory.com/2215
Tiles와 SIteMesh 차이 2009.05.01 http://whiteship.tistory.com/2216
Tiles https://tiles.apache.org/ https://github.com/apache/tiles
https://github.com/apache/tiles/releases 3.0.5 가 2014.09.22
- Sitemesh http://wiki.sitemesh.org/wiki/display/sitemesh/Home https://github.com/sitemesh/sitemesh3/releases 3.0.1 이 2015.05.29
6.4 Thymeleaf로 작업하기
JSP 의 문제점
내부가 HTML 또는 XML 의 형태로 되어 있지만, 실상 어느쪽도 아님
<input type="text" value="<c:out value="${thing.name}"/> />
html 이지만 html 이 아니다. 브라우저에서 열어 볼 수 없다. 그렇다고 보기 좋지도 않다.
템플릿 코드 자체가 HTML 이라 브라우저에서 바로 열어 볼 수 있는 템플릿을 Natural Template 이라고 함.
서블릿 스펙과 강하게 결합되어 있다. 서블릿 기반 웹 애플리케이션의 웹 뷰에 사용된다는 것을 의미. 이메일 형식 등 다른 목적의 템플릿이나 서블릿 기반이 아닌 웹 애플리케이션에는 좋은 선택이 아님
thymeleaf
왜인지는 몰라도 spring 에서 thymeleaf 를 밀고 있다.
장점: Natural Template 이라 브라우저에서 바로 열어 볼 수 있다. 다만 완벽하지는 않음. th:href 때문에 링크 동작 안함.
thymeleaf 기본 예
<table>
  <thead>
    <tr>
      <th th:text="#{msgs.headers.name}">Name</th>
      <th th:text="#{msgs.headers.price}">Price</th>
    </tr>
  </thead>
  <tbody>
    <tr th:each="prod: ${allProducts}">
      <td th:text="${prod.name}">Oranges</td>
      <td th:text="${#numbers.formatDecimal(prod.price, 1, 2)}">0.99</td>
    </tr>
  </tbody>
</table>
th:each, th:text 등 약간 익숙하지 않은 속성이 보이지만 JSP 에 비해 깔끔하다.
${} 변수 표현식
${session.user.name}
<span th:text="${book.author.name}">
<li th:each="book : ${books}">
*{} 선택 표현식
th:object="${spitter}" 후 th:field="*{firstName}" 하면 Spitter 객체의 firstName 프로퍼티
<div th:object="${book}">
  ...
  <span th:text="*{title}">...</span>
  ...
</div>
자세한 문법은 http://www.thymeleaf.org/doc/articles/standarddialect5minutes.html 의 내용을 참고 한다.
thymeleaf 사용해 보기
dependency 추가
compile "org.thymeleaf:thymeleaf-spring4:$thymeleafVersion"
config
  @Bean
  public ViewResolver viewResolver(SpringTemplateEngine templateEngine) {
    ThymeleafViewResolver viewResolver = new ThymeleafViewResolver();
    viewResolver.setTemplateEngine(templateEngine);
    return viewResolver;
  }
  @Bean
  public SpringTemplateEngine templateEngine(TemplateResolver templateResolver) {
    SpringTemplateEngine templateEngine = new SpringTemplateEngine();
    templateEngine.setTemplateResolver(templateResolver);
    return templateEngine;
  }

  @Bean
  public TemplateResolver templateResolver() {
    TemplateResolver templateResolver = new ServletContextTemplateResolver();
    templateResolver.setPrefix("/WEB-INF/views/");
    templateResolver.setSuffix(".html");
    templateResolver.setTemplateMode("HTML5");
    return templateResolver;
  }
만약 spring boot 라면 spring-boot-starter-thymeleaf 하나 추가 해 주면 된다.
compile('org.springframework.boot:spring-boot-starter-thymeleaf')
spring boot 에서는 별도 설정을 안하면 기본 자동설정으로 resources/templates 에 템플릿 파일을 넣으면 인식한다.
thymeleaf 에서의 layout은?
http://www.thymeleaf.org/doc/articles/layouts.html 그냥 include 해서 쓰거나
- Apache Tiles 2 Dialect https://github.com/thymeleaf/thymeleaf-extras-tiles2
- Thymeleaf Layout Dialect https://github.com/ultraq/thymeleaf-layout-dialect
를 쓰면 될 듯 하다.
Spring Initializr 에서 선택 가능한 템플릿 엔진
Spring Initializr 에서 선택 가능한 템플릿 엔진으로 Freemarker, Velocity, Groovy Templates, Thymeleaf, Mustache 가 있다.
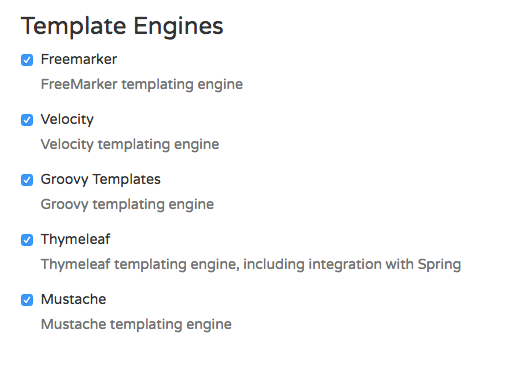 출처: http://start.spring.io/
기타 템플릿 엔진들
다른 템플릿 엔진들 맛보기

- https://www.google.com/trends/explore#q=freemarker%20template%2C%20velocity%20template%2C%20thymeleaf%20template%2C%20handlebars%20template%2C%20jade%20template&cmpt=q&tz=Etc%2FGMT-9
2016.06.14 캡쳐
velocity 가 여전히 강세이나 점점 사그라 들고 있음
- jade 가 치고 올라옴
- handlebars 도 만만치 않음
- freemarker 는 꾸준함
- thymeleaf 도 조금씩 올라오고 있지만 미약함
Velocity
- http://velocity.apache.org/
- http://velocity.apache.org/engine/index.html
- http://velocity.apache.org/engine/1.7/user-guide.html
<html>
  <body>
    Hello $customer.Name!
    <table>
    #foreach( $mud in $mudsOnSpecial )
      #if ( $customer.hasPurchased($mud) )
        <tr>
          <td>
            $flogger.getPromo( $mud )
          </td>
        </tr>
      #end
    #end
    </table>
  </body>
</html>
인기 좋았던 템플릿 엔진. 그러나 Spring 4.3 에서 Deprecated 됨
SRP-13235 Deprecate Velocity support
https://jira.spring.io/browse/SPR-13235
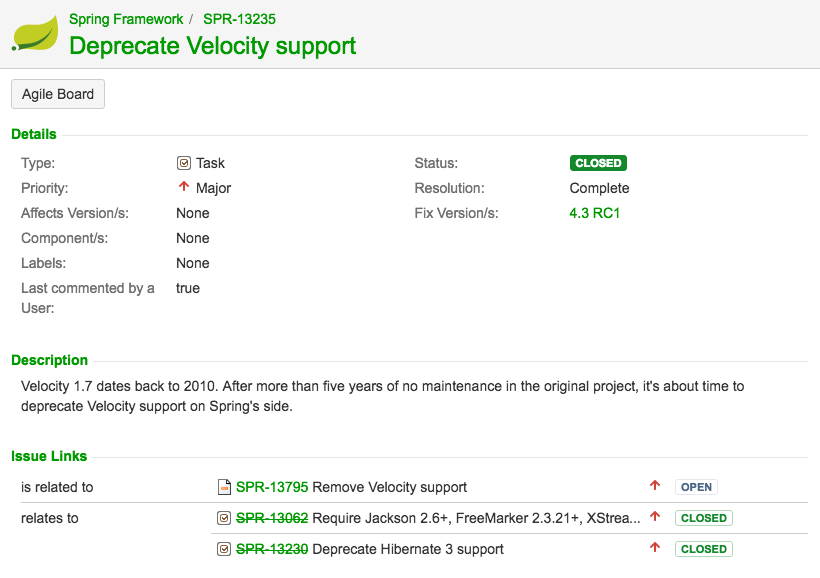 이유는 Velocity 1.7 이후로 5년 넘게 유지보수 되고 있지 않아서 deprecate 함
Freemarker
http://freemarker.org/ http://freemarker.org/docs/
템플릿엔진이다. html, email, 설정파일, 소스코드 생성에 사용
<html>
<head>
  <title>Welcome!</title>
</head>
<body>
  <h1>Welcome ${user}!</h1>
  <p>Our latest product:
  <a href="${latestProduct.url}">${latestProduct.name}</a>!
</body>
</html>
조건문
  <h1>
    Welcome ${user}<#if user == "Big Joe">, our beloved leader</#if>!
  </h1>
<#if animals.python.price == 0>
  Pythons are free today!
</#if>
Template Toolkit
http://template-toolkit.org/ perl 에서 주로 사용. python 도 사용 가능.
http://template-toolkit.org/about.html
layout
<!DOCTYPE HTML PUBLIC "-//W3C//DTD HTML 4.01 Strict//EN">
<html>
<head>
<title>[% title %]</title>
</head>
<body>
<div id="header">
<a href="/index.html" class="logo" alt="Home Page"></a>
<h1 class="headline">[% title %]</h1>
</div>
[% content %]
<div id="footer">
<div id="copyright">
© [% copyright %]
</div>
</div>
</body>
</html>
content
[% WRAPPER layout
     title     = "My First Example"
     copyright = "2007 Arthur Dent"
%]
<p>
  Hello World!
</p>
[% END %]
Groovy Templates
http://docs.groovy-lang.org/latest/html/documentation/template-engines.html
ex) xml
xmlDeclaration()
cars {
   cars.each {
       car(make: it.make, model: it.model)
   }
}
ex) html
yieldUnescaped '<!DOCTYPE html>'
html(lang:'en') {
    head {
        meta('http-equiv':'"Content-Type" content="text/html; charset=utf-8"')
        title('My page')
    }
    body {
        p('This is an example of HTML contents')
    }
}
layout 구성. layout-main.tpl
html {
    head {
        title(title)
    }
    body {
        bodyContents()
    }
}
content
layout 'layout-main.tpl',
    title: 'Layout example',
    bodyContents: contents { p('This is the body') }
Mustache 와 handlebars.js
https://mustache.github.io/ Logic-less templates.
http://mustache.github.io/mustache.5.html
지원언어: Ruby, JavaScript, Python, Erlang, node.js, PHP, Perl, Perl6, Objective-C, Java, C#/.NET, Android, C++, Go, Lua, ooc, ActionScript, ColdFusion, Scala, Clojure, Fantom, CoffeeScript, D, Haskell, XQuery, ASP, Io, Dart, Haxe, Delphi, Racket, Rust, OCaml, Swift, Bash, Julia, R, Crystal, Common Lisp, and for Nim
템플릿
<h1>{{header}}</h1>
{{#bug}}
{{/bug}}

{{#items}}
  {{#first}}
    <li><strong>{{name}}</strong></li>
  {{/first}}
  {{#link}}
    <li><a href="{{url}}">{{name}}</a></li>
  {{/link}}
{{/items}}

{{#empty}}
  <p>The list is empty.</p>
{{/empty}}
값
{
  "header": "Colors",
  "items": [
      {"name": "red", "first": true, "url": "#Red"},
      {"name": "green", "link": true, "url": "#Green"},
      {"name": "blue", "link": true, "url": "#Blue"}
  ],
  "empty": false
}
결과
<h1>Colors</h1>

<li><strong>red</strong></li>

<li><a href="#Green"green</a></li>
<li><a href="#Blue"blue</a></li>

empty 를 true 로 바꾸면 아래에 한줄 더 나온다.

<p>The list is empty.</p>
handlebars 는 mustache 의 확장판
Handlebars.js is an extension to the Mustache templating language created by Chris Wanstrath. Handlebars.js and Mustache are both logicless templating languages that keep the view and the code separated like we all know they should be.
Jinja2
python 의 템플릿 엔진. ansible 에서도 사용함. http://jinja.pocoo.org/
{% extends "layout.html" %}
{% block body %}
  <ul>
  {% for user in users %}
    <li><a href="{{ user.url }}">{{ user.username }}</a></li>
  {% endfor %}
  </ul>
{% endblock %}
Jade
http://jade-lang.com/ nodejs 에서 사용되는 템플릿엔진. HTML 과 달리 닫는태그가 없고 상속을 지원함.
doctype html
html(lang="en")
  head
    title= pageTitle
    script(type='text/javascript').
      if (foo) {
         bar(1 + 5)
      }
  body
    h1 Jade - node template engine
    #container.col
      if youAreUsingJade
        p You are amazing
      else
        p Get on it!
      p.
        Jade is a terse and simple
        templating language with a
        strong focus on performance
        and powerful features.
아래처럼 변환된다.
<!DOCTYPE html>
<html lang="en">
  <head>
    <title>Jade</title>
    <script type="text/javascript">
      if (foo) {
         bar(1 + 5)
      }
    </script>
  </head>
  <body>
    <h1>Jade - node template engine</h1>
    <div id="container" class="col">
      <p>You are amazing</p>
      <p>
        Jade is a terse and simple
        templating language with a
        strong focus on performance
        and powerful features.
      </p>
    </div>
  </body>
</html>
레이아웃 구성하기
layout.jade
doctype html
html
  head
    title hello world
    link(rel='stylesheet', href='/csslib/bootstrap.min.css')
    script(src='/jslib/jquery-2.1.3.min.js')

  body
    block content
block content 에 본문이 들어가게 된다.
home.jade
extends layout
block content
    #container
        include nav
        .boxed
            #content-container
            ...
스프링에서 사용하도록 만든 spring jade4j 도 있다. https://github.com/neuland/spring-jade4j
템플릿과 상속
- Jade, Jinja2 등 의 템플릿 엔진은 템플릿 상속(template inheritance) 을 통해 레이아웃을 쉽게 관리한다.
- 상속기능을 제공하지 않는 템플릿 엔진들을 레이아웃 엔진의 도움을 받게 된다.
- JSP 나 Freemarker 도 상속기능을 구현해서 사용하기도 한다.
주저리
예전에 비해 서버사이드 템플릿 엔진의 필요성이 많이 떨어졌다. 더 이상 많은 페이지를 작성하고 있지 않다. 적은 수의 페이지에서 화면을 다양하게 그린다. 데이터는 따로 조회해 와서 화면에 그린다. angular, backbone, react 등 이 뜬다.
참고자료
- https://en.wikipedia.org/wiki/Comparison_of_web_template_engines
Spring과 Template Engine, 현업에서는 어떻게 사용하나요? 2014.10.01 https://slipp.net/questions/294
Thymeleaf 사용 소감 2013/08/12 https://blog.outsider.ne.kr/969
- 레이아웃 템플릿 엔진 Tiles, Sitemesh
- 텍스트 템플릿 엔진 Freemarker, JSP, thymeleaf
https://spring.io/blog/2012/10/30/spring-mvc-from-jsp-and-tiles-to-thymeleaf
http://coding-slave.blogspot.kr/2016/01/web-spring-spring-boot.html
- spring-boot-starter-web 에 포함된 tomcat 은 jsp 엔진을 포함하지 않는다.
tomcat-embed-jasper, jstl 을 의존성에 포함시켜줘야 JSP 파일 구동이 가능
JSP 는 spring boot 기본 templates 폴더 안에서 작동하지 않는다.
- application.properties 에 다음과 같은 설정을 추가해 주어야 한다.
spring.mvc.view.prefix=/WEB-INF/jsp/
spring.mvc.view.suffix=.jsp
http://docs.spring.io/spring-boot/docs/current/reference/html/common-application-properties.html
JSP/Freemarker 템플릿 상속을 통한 레이아웃 관리 2013/09/12 http://kwon37xi.egloos.com/4827957